Volgers

vrijdag 29 juli 2011

Day 5 of the corners / wicker baskets tutorial.

 We made a basket, only one each.
Let me show you how we did it:
First you need a piece of sticky florist tape.
 I did cut a piece 50 cm and cut that piece lenghtwise in tree pieces.
Wrap that around a florist wire of 7mm.
Saw a circle from thin wood and dril holes in it not to far apart from eachother, make sure it is an uneven number.
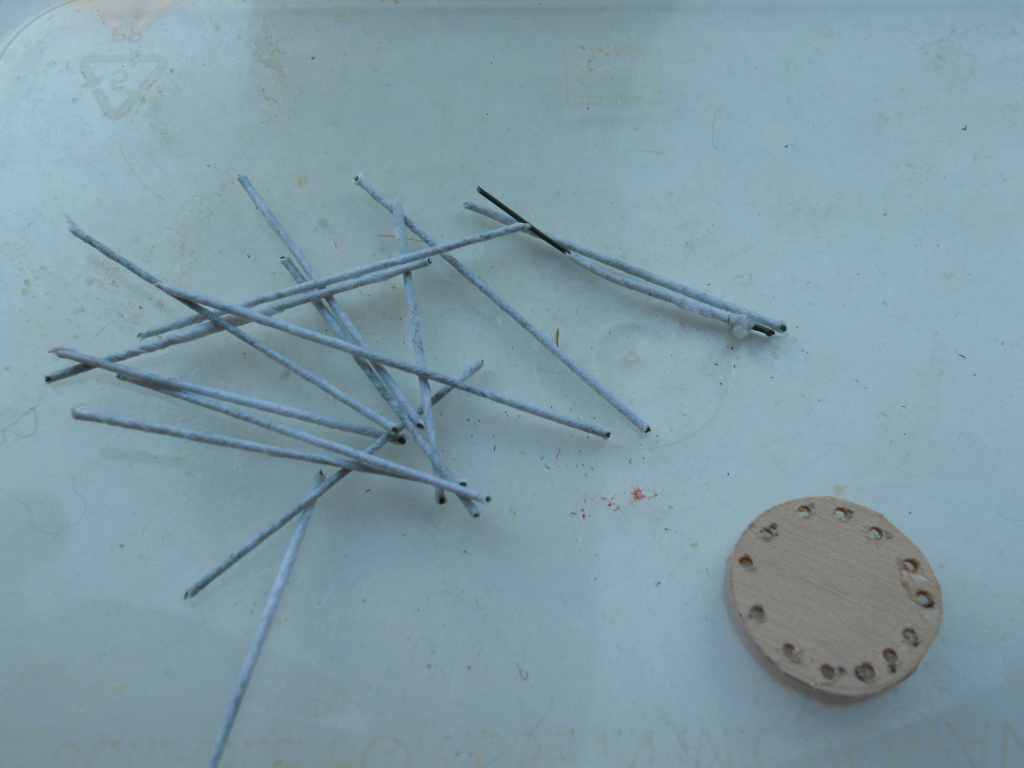
 Cut the wire a bit longer than you want your basket to be.
 Glue the wire in the holes.
 Weave small rope or cotton tread around the wire.
 If you want your basket to be wider on top bent it before weaving.
Finish of by making handels from a piece of rope  or not and make a braid to decorate the top and hide the wood on the bottom.
We used tacky glue because that doesn't make stains when dryed.
On the picture the glue is still wet.
 A lot of work, but they turned out pretty cute, don't you think?
I hope you like this tutorial .
If you have questions, please ask, i'll be glad to help.

zaterdag 23 juli 2011

Day 4 of the corners/ wooden beads and more

Oke, i let you wait for the results of last wednesday, because i had a litlle party.
Look here what we did.
My mother wanted her bureau a bit higher, because she had a gorgious sewing table she wanted to put in her corner.
She glued 6 wooden beads under it, now it has the good hight.


 This is the sewingtable, isn't it gorgious.
No she didn't made it, but she bought it at a car boot sale a while ago.
 The rug she made during last week.
It is knotted and then the dreads are cut smaller.
She also knitted this vest and skirt last week.
I love the buttons she used.

You can see my mother had more time.
She is not working anymore.
I did nothing last week, well not making miniatures, i did a lot but no time for making mini's.
I am so happy my mother comes on wednesday evening, so i have to make time for mini's.
I love our evenings together.

This is what i did with beads.
 I took 4 beads.
 I sawed a square to go on top and tadaaaa! I made a stool.
 Then i first painted the top bleu and crocheted acover for the top.

 I crocheted a granny square and when the square was as big as the top i crocheted in round.
Oke that was all folks.
0   0
I
~~~~~~

donderdag 14 juli 2011

Day 3 of the corners/ making a desk

Making a desk from ....
Matchboxes
 First take 3 little matchboxes who are the same size.
 Cut a them a little smaller.
 I made them 3 cm.
Measure the outside and the inside of the matchboxes.
 When you draw the line.
like this
 You can cut it with a scissor.
 Now you have 3 little drawers and 3 bigger drawers.
 The smal drawers, i glued together, side by side.
Then i put a piece of carton on top and on the bottom of these.
 To let dry the glue, i used clothespins.
 Then i glued the 3 bigger drawers on top of eachother (not on the photo).

 Then i saw two pieces of wood, one for the top and one for the side of the desk.
Take a piece of carton the same size of the side of the big drawers.
Glue it on.
 Give every thing a coat of blue paint.
 If it is painted the carton and the matchboxes and the wood look the same.
 My mother gave it an vanilla-cream color first and over that a coat of waterdowned green.
 Her desk is a little different then mine.
Not only the color but her drawers are on the other side and she has two drawers on top.
 And this is the result so far.
 My mother's corner in green....
 and mine in blue.
I also gave a little white wash to the paint, making it look a little more older and softer.
I did this by using a dry brush with a little bit of white paint.
 Now we have to fill the drawers.
My mother did knit a little doll during last week, to go in her corner.
Isn't it a cuteeeee!

That's all for now.
Hope you liked it.
Hugs
Maria 
greetings from my mum.

donderdag 7 juli 2011

Day 3 of the corners/ filling the racks

 A couple of years ago a nice lady gave me her leftovers from quilting, now they come in handy.
 They all have diffrent colors and paterns.
 We have roughly measured how big the piles of fabric were to be.
Cut some carton in that size.
Folded and glued the fabric around the carton.( with Tacky Glue)
Than i printed some free prints from a blog i can not remember, sorry.
If you recognize your prints please let me know so i can put the name of your blog here.
We glued some paper inside to look like pages of the book.
That is all we did.
Not much this time, but we filled a couple of planks.
Both in our own way.
 This one is from my mother.

 and this one is mine.

We still need lots of stuf to make to fil up the shelves, but it begins to look oke.
See you next week with the rest of this project.
Meanwhile i am still working on my big house.
I will post the progress of that so you don't have to wait till next week for blogpost.
Bey for now.